Tuesday, February 15, 2022

Hero Hunters VFX Sample


Well, it’s not exactly a ‘reel’, but it will give you a good idea of what sort of VFX work I’ve been doing.  This is a collection of short clips of hero skill and hero screen presentation VFX.

My goals for Hero VFX in Hero Hunters were twofold.  To communicate clearly to the player what was happening and when it was happening, first of all.  Good VFX in my opinion would accentuate the hero art and animation, and also give some insight into the skill design. Secondly, to keep things exciting and enticing for the players by always experimenting with new techniques, and working with programmers to add new features to the engine when needed.

For these VFX, I was kind of a one man band so I came up with the VFX concept, the 2d and 3d assets, the VFX related animations, the materials, the particle system, scripts, and the implementation.  I was also responsible for maintaining visual quality and performance throughout my tenure on the project.

The art direction was already set when I joined the project, so my VFX design had to conform to what was already established.  During this time, I was also working on several prototype projects.  Additionally, I wrote the job description for, hired, onboarded, and led a VFX artist.

Hothead Games decided to sell the IP to DECA.  Also while leading a VFX Artist and doing my normal duties on the project, I played an important role in the due diligence phase of the sale.  I onboarded DECA’s art team by planning and conducting group seminars and also through one on one mentoring.  I was also responsible for documenting not only my process, but animation process, versioning environment (with respect to artist workflow), and scripting capabilities of the engine regarding art implementation and scripted actor behaviours.

The clip without sound is a known issue.  My apologies.

UI Image Exporter

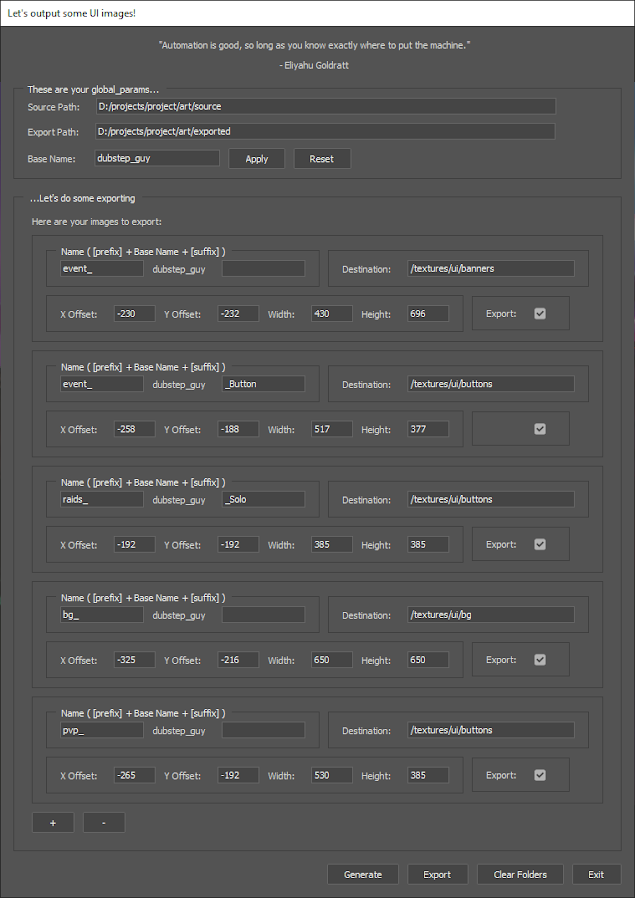
The UI Image Exporter main interface


What is it?

The UI image exporter is a photoshop script that allows artists to take a master image and cut it up into smaller subsections based on user defined profiles, for the purpose of making UI elements such as portraits, buttons, and backgrounds with required dimensions. Before exporting, It allows the artist to edit the subimages in any way they wish in the same document. The script will remember and store changes to the export profiles per master image.

Why is it helpful?

The script is intended not only as a tool to export multiple images from a master image, but also to help with managing the process of editing many output files. The script will create folders that mask out the correct dimensions, and the contents of each folder are customizable by the artist like any other photoshop document.

What’s cool about it, technically?

The script has a partially dynamic UI. It generates UI entries for each output profile, and profiles can be added and removed in the UI. So, the script can work with as few as one output profile, or as many as you need.

The script also works out its cropping dimensions based on a user defined point of interest (POI). The user nominates a POI using a photoshop layer and a brush stroke, and the script will focus on that area when it’s doing its cropping.

How do I use it?

Run the script in photoshop using whatever method you wish. Depending on the state of the master image, it will help you set up your document with the right layers, and then it will show you the UI. This is usually accomplished by running the same script a few times, since you can’t do any editing in photoshop while scripts are running.

First time running

If the document doesn’t have a POI layer set up, then the script will make one for you and ask you to put a mark where the POI should be. If that all goes well, then you can run the script again and it will load the GUI.

The script will create a layer called POI for you.  Place a mark and restart the script.

Second time running

When you run the script with a POI layer, the GUI will appear and you will see three main sections.

Global Params

The global params are at the top of the UI, under the 'quote of the day'.


At the top of the UI there are the global params.  The first two paths are assumed to already exist.  The paths are to the base folder for source art and exported art, ostensibly in some kind of file versioning workspace.

Changing the base name and hitting apply updates all export profiles.

Under the paths is a base name. This is the base name of the textures that will be generated ie. prefix_basename_suffix.png. The base name to start will be the name of the art layer (likely layer 1). Changing the base name and hitting apply will update the export name and the current config. Hitting reset will reset the below export profiles to whatever is in the current config, so any changes in those profiles in the ui will be lost.

Export Profiles

Below that is a box of export profiles. Each profile has text boxes for a file name prefix, suffix, and export destination, offsets relative to the POI position, target ui element dimensions, and an export checkbox.  These details would normally be decided on ahead of time, but they can be edited in the UI, and the settings are saved out alongside the psd.

Profiles can be added and removed using the [+] and [-] buttons below.

You can add and remove profiles dynamically.


Script Functions Buttons


The business end of the UI.

At the bottom there are 4 buttons to activate script functions.  The generate button will generate photoshop folders and masks based on the specifications of each export profile.  


Clicking generate creates a folder with a mask for each output profile.

Once the export folders have been generated, the artist has the opportunity to edit the contents of the folder.  If the image composition has to work with other UI elements, they can be added as overlays by the script. Masks can also be added, which would be exported with the UI image.

The artist can edit the composition of the UI panel.  Overlays can be added if the image will be under other UI elements.

Clear folders will delete any folders created by the script so the artist can start fresh if needed.  And exit exits the script.

The artist can clear all the folders the script generated if desired.


Third time running, the final export

After evaluating the composition of each folder, the artist can fire up the script again to do the final export.

The export button will export each of the export folders once they are generated and tweaked by the artist.  Any overlays that were left on will automatically be turned off.  The resulting images will be converted to the next highest SPOT resolution.

The script will export any folder with the export checkbox enabled.


At this point, all of the export targets are in the correct folders, and the script has created a photoshop document in the source art folder.  The artist can save the changes they made.  The script remembers any changes in export settings so when the script is opened while a previous psd is open, it will recall the previous settings.

The config file is in a format that is easily human readable, and of course, if it is edited by hand, those changes will be reflected next time the script loads the config.

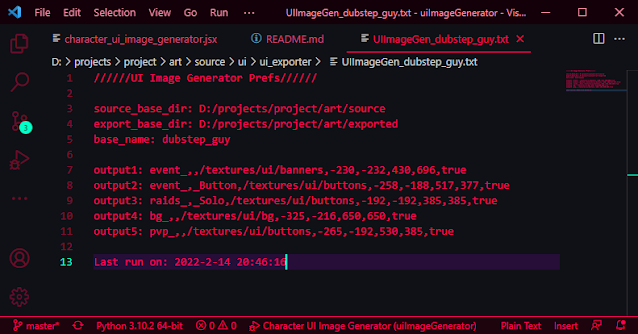
The config is designed to be easy to read.


Input and output

Firstly, I want to acknowledge profusely that the image I used to demonstrate the process is not mine.  It was created by an artist named Matt Zeilinger.  The image is from a character art tutorial, using a character from a game called Netrunner.  The image came up in a google search looking for character art.  The reason I chose this image is because it has the kind of composition that works well with the script.  So, all artistic props to Matt Zeilinger.

So, from the excellent image by Matt Zeilinger, we have various outputs with different dimensions, compositions, and masks, all done in under ten minutes without digging through menus, having to recall dimensions for UI elements, or anything like that.  The images are ready to be uploaded using any version control software.

Input

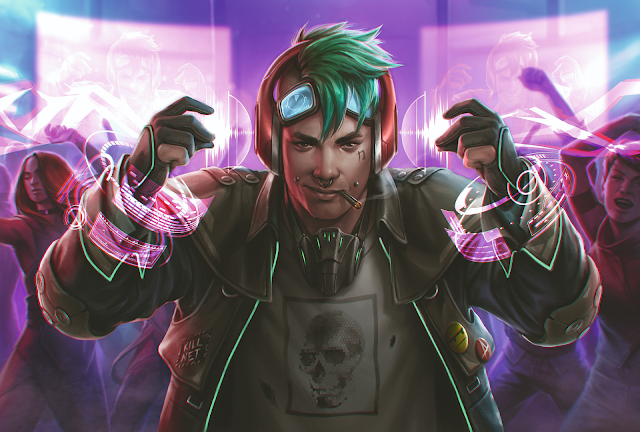
The glorious character art by Matt Zeilinger.  Used here for demo purposes only.


Output


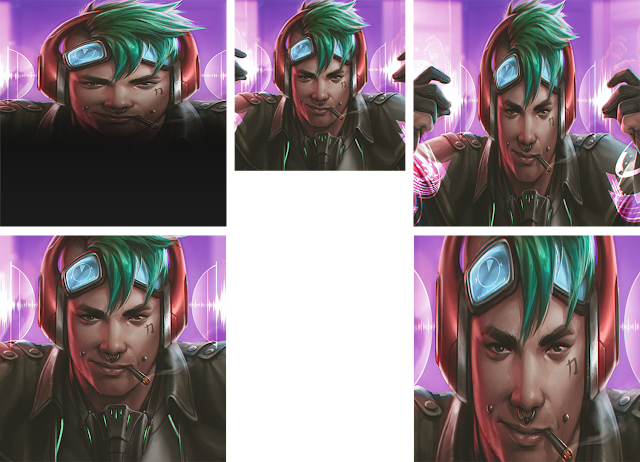
The various output images.  Notice the mask on the top left, scooped up by the script.


Check out the script on my github project!

Monday, February 14, 2022

Free Games Bot


The Free Games Bot output in my discord channel

This is a little project that I made in my spare time. My goal was to learn more about python scripting by trying to make it ‘do things’. Free games bot is a script that interfaces with the API of a game sale aggregating website called IsThereAnyDeal.com, sorts the payload it receives as a result of its search parameters, and then posts the results on either slack or discord channel using webhooks.

It can be run manually, or can be added to the windows task scheduler to be run as often as you wish.

The search parameters and other information are loaded from a json file. The settings json can have more than one bot profile in it. Multiple profiles can be used to post to multiple channels using different webhooks urls, to store different search criteria or both.

Each profile records what it found last session in a json. Since it remembers what it found last time, the likelihood of repeat posts is reduced.

Bot Settings

The settings JSON may contain multiple bot profiles, each with their own unique settings and discord or slack channel targets.

ITAD API Parameters

The API Parameters are key value pairs that are sent to the ITAD web API to specify what data you want to receive in the payload.
  • key: The API Key from ITAD.
  • offset: The position at which to start the search. ie. From the 500th entry.
  • limit: The number after which to stop. ie. After 4000 entries.
  • region: Filters results by countries within a region.
  • country: Filters deals by country, as well as determines the currency conversion.
  • shops: Filter by specific shops. This is set programmatically by the script based on the store filter.
  • sort: Criteria to sort by. ie. By price cut in descending order.

Other Parameters

  • web_hook_address: The address of the webhook from your discord channel.
  • store_filter: Can either exclude or include shops from the complete list of shops. The value here will inform what gets sent to the ITAD API.
  • game_filters: The script will go through the data downloaded from ITAD and filter it based on criteria.
    • min_discount_percent: The minimum discount to report in percent.
    • min_price_old: The minimum before-sale price to report in dollars.
    • max_price_new: The maximum sale price to report.
    • exclude_keywords: Any problem keywords in game titles you don't want to hear about.
  • tracking_json: The filename of the tracking json to be created. It's so you can give a unique name to your record per profile. The record is the bot's memory of what it posted yesterday.

You can check out my project on github!

Tuesday, June 12, 2012

My Demo Reel

Here is my demo reel.


For best results, click the youtube button and watch it in HD.

It is a combination of in-game footage shot with fraps and rendered scenes, composited in After Effects.

Sorry for the ads if you see them.  They are there because I chose to use music which, while excellent, is not made by me.  It's not that I'm trying to monetize my own demo.  I think it's a pretty fair trade off.

The in-game scenes were shot with a fair degree of scripting and other methods to cajole the game to behave more like a movie set.  I had a narrative in mind and I shot a lot of footage but the story was too cumbersome for the reel, so I'm going to finish it as a machinima, time permitting :)

The AH-1, my biggest project to date

The AH-1 in Vray

This model is by far the biggest project I have ever taken on.  In retrospect, it may have been a little too big!  There were many challenges relating to reference and the level of accuracy I wanted.  Eventually, I was able to get an actual combat pilot to give me some additional reference and pointers.

I made a bunch of alphas for different kind of screws and bolts, and had to experiment a great deal to get the right texture for all of the various  materials.  This model is a simulator type 'hero' model, with a fully detailed interior for both crew stations.  In the game it has as many working dials as I could make.  Operation Arrowhead isn't a flight sim so there are a few unused ones.  The model is almost entirely hand painted with some photo reference / grunge textures used to make the matte paint look more scuffed up.

The dash of the pilot's 'work station'.  You can see a little of the
condensation streaks I put on the windows.


The gunner's 'work station'.

The in-game asset has ten visual LODs, including two 'pilot view' ones, four shadow volumes, and several other hit locations.  The Real Virtuality engine allowed me to apply different materials to different locations of the LOD that interacts with the ballistic and damage simulations, so the various armour plates, engines, transmission, rotors, etc all have different abilities to stop or deflect different kinds of bullets.  Additionally, the engine, transmission, tail rotor, systems, and turret may each be damaged or destroyed with different effects for each.

The first resolution LOD of this model has 10k points and 10k faces.  It has 15 sections with its various proxies, and flare textures.  The exterior of the model has 2 textures, one for the fuselage, and one for everything else, and the interior has 4 to keep the text legible.

It is difficult to characterize the work and fiddly detail went into this project and its various features, don't feel shy to ask questions about it.  More shots are available on my Picasa Album.  Be sure to check out the descriptions :)  All of the shots in the album are from the game engine model viewer that comes with the community tools, so it is more or less how it looks in game.


https://picasaweb.google.com/105138191083148456220/ThingsYouMayHaveMissedAboutTheAH1?authuser=0&authkey=Gv1sRgCJ2Tmde_yajEeg&feat=directlink

The Trabant, a car made of wood chips and epoxy


The Trabant in Vray.  It has a higher polycount than the in-game model

This model, as well as the rifle and the helicopter were done for a project called CWR2, which is supported by Bohemia Interactive to sort of recreate their Operation Flashpoint in their new engine.  The project have me some latitude when it came to deciding what I wanted to model.  I chose this, a car from 60s East Germany- and perhaps the worst car ever produced- because I thought it would be something not many people have seen before.

The big challenge was getting this thing to look old and used because it is made of plastic.  Actually it's made of something called duroplast, which is, I guess, paper pulp bonded with glue, and so it doesn't rust.  In fact, the paint doesn't really seem to come off either.  In the game I have it a blotchy texture with areas of sun bleached paint that I had to take off of the render version because it just ended up looking ambiguously like some kind of render artifact.


The Trabant (made by me) in Operation Arrowhead (which is not made by me ;)

Since the game is a simulator, this car has several different levels of detail, and interior and exterior models.  It's not a hero model, but the polycounts in Operation Arrowhead are quite high since every vehicles is drivable / destroyable / what have you.  This first LOD has 3786 points and 3888 faces ~ 6500 triangles, and the last one has 240 faces.  With the different materials, proxies, flare objects, etc, this model has six sections.

The textures are a mixture of hand painted and photo reference.

The xm177e2, a pilot's best friend

A shot of xm177e2 using Xoliul's excellent directX shader


This rifle was interesting to me because it was sort of similar to the sort of 'elite' kinds of rifles you see in modern warfare type games- it was the precursor to the M4- but it's also kind of weird and awkward looking.  The age of it gave me some latitude to make it look pretty bashed up, since the story it was made for takes place in the 80s and the rifle was first developed in the 60s.  It was used in the vietnam war.  In gathering reference for the rifle, I learned that its early versions had all kinds of problems that made the bullets suddenly turn sideways and tumble in flight, and the muzzle blast was too loud so it was really a pain to shoot.  These kinds of tidbits are really interesting to me, and gave me an excuse to make a giant fireball come out the end of it when it is shot at night.  Everyone loves huge fireballs, right?

A friend of mine had a similar 'training' type rifle lying around, so I was able to get the general dimensions of it using micrometer calipers- not that I needed measurements accurate down to a micrometer, it's just the set of calipers I had access to.

Like the other assets I made for Cold War Rearmed ², this one has several LODs.  The first LOD has about 6000 points, which is about average for assets in Operation Arrowhead, and the last one has 600.  The textures are entirely hand painted.